Last week, I spent in Madison, Wisconsin. The university’s College of Materials Science had its annual core facilities open house. Since, the college had purchased a DualBeam last year, I was invited to speak on focused ion beams and then also spend a day with people on the microscope.

Madison, as a small city, is actually a fun little place to stay a few days. If you don’t know, Wisconsin, is known for beer and cheese. The downtown area lies on an isthmus and is structured around the capitol building.

The weather started to turn bad on Friday afternoon and when I arrived at the airport, there was an earlier flight to Minneapolis I could catch that would get me home 3 hours earlier. However, the flight had been delayed by an hour due to weather. I was lucky enough to get on this delayed flight, but had no idea if it would actually take off. Well it did and the flight I would have been on was cancelled due to weather. Phewww! The problem with flying home on Fridays is that the later the flights, it seems the higher the chances that something can go wrong in getting home. Well, anyway, I did make to MSP and my flight home took off on time.
Frock Coat
This week’s project is focused around making the frock coat I will wear. As I have mentioned several times in my blogs, I am using patterns made by Reconstructing History. I began by tracing off the patterns for the frock coat and added 1/2″ seam allowance.

After the patterns were traced off, I began cutting fabric. I’ve been pretty excited about working with this fabric. It’s heavier and more sturdy than the silks I’ve been working with so far.
For the pattern pieces that were narrow enough, I cut both the lining and outer fashion fabric at the same time. For the front coat pieces, I cut them each individually, ensuring the pattern matched on both sides.

Also, I as I mentioned in my post on the waist coat, I have chosen a heavy weight buckram type interlining. In the pattern instructions, it indicated to use cut a 4″ strip along the front center and for the skirts of the coat, to use a spongey type fabric like a loose wool. I’m going to try and interline the whole front and back pattern piece with the buckram fabric and see how it turns out. I think I can switch this out pretty easy if I need to. After I cut out the interlining, I pinned it to the wrong side of the fashion fabric and overlocked the two pieces together. Normally, I would have basted the two together from the center outward, but these two fabrics stuck together pretty well, so I took a chance to just overlock..

1. Pin and stitch the center backs together. Press seams open

2. Attach fronts to back at the shoulder. Pin and stitch. Press seams open

Pockets
I’ve chosen to have a separate post on pocket construction for this frock coat and the waist coat. It is located here.
3. Pin and stitch the side seams together. On the pattern, there are points marked X and Y for the back and sides, so follow the instructions about leaving the portions of the sides open at these points. Press seams open

4. Repeat steps 1-3 for the lining


5. Match the fashion fabric to the lining, right sides together
6. Baste the center back seams of the fashion fabric to the lining
7. Pin and stitch the outer fabric to the lining along the front edge and around the back


8. Trim and clip the seams allowances. Fold right side out and press

Collar
To reinforce the collar, I interline the collar with the heavy buckram lining.
9. Pin and stitch along the sides and top of collar. Trim and clip. Fold right side out and press seam
10. Pin the outer fabric of the collar to the neck of the coat. Stitch

11. Whip stitch the lining to the lining of the frock coat. Press

Sleeves
12. Pin and stitch the upper sleeve to the lower sleeve for the right and left sleeves. Pay attention to the orientation of the sleeves

13. Fit the sleeves to the frock coat, gathering around the armscye. Pin and stitch

14. Pin and stitch the upper sleeve lining to the lower sleeve lining and pin the cuff lining to the out fabric cuff. Stitch. Do this for both sleeves

15. Pull the sleeve lining up through the arm
16. Press down the lining seam allowance and whip stitch to the body lining

Cuffs
17. Follow the instructions of the pattern for aligning the cuffs
18. Pin and stitch the side seams. Press open

19. To the same for the lining, if lining
20. Turn the out fabric cuff right side out and slip inside the lining cuff, which is wrong side out
21. Pin and stitch the wrist edge closed

22. Turn the cuff right side out, press seam

23. Gather top open portion of the cuff, pin and stitch to the sleeve

24. Fold up lining and whip stitch closed
At this point, the frock coat construction is complete. What is left is embellishing the coat with buttons and trim.
In terms of sizing, I run a medium and for suits between a 40R and 42S. Based on the waist coat, I chose to construct the frock coat in a 42. I wish I would have gone with the 40. I think it will work out fine, but I prefer the cut a bit more slim. I did fit this, but unfortunately, I didn’t do as good as a job as I could have.
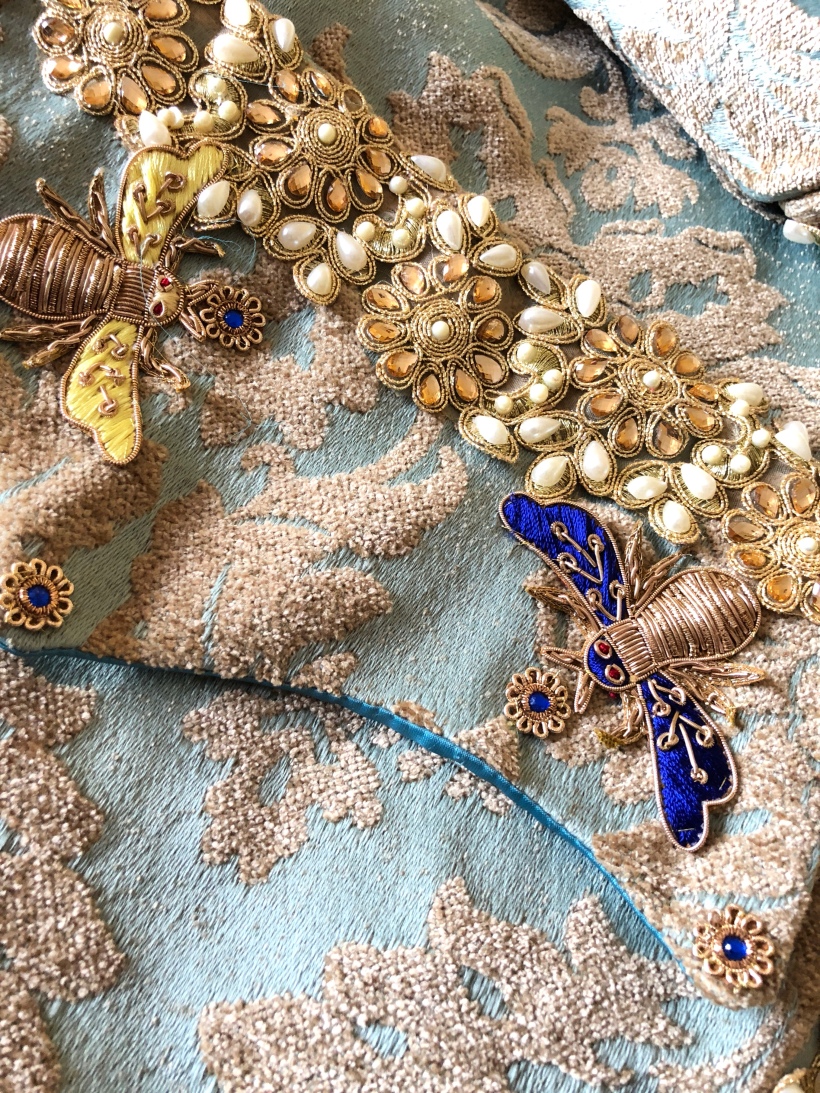
The trim I used came from India and discussed the shop on Etsy in my last post on waist coat. It’s super sparkly and should look amazing at Fetes!
In terms of buttons, I ended up putting 20 buttons on the front. I’m still contemplating adding the button holes. I don’t plan to use them and it would be hard to see them in the trim.
In the end, the frock coat turned out pretty amazing though it weighs a ton!

Until next time!

Is the link to the Pockets guide broken? Your instructions are *SO MUCH* better than what came with the patterns.
LikeLike
also, what do you do with all the spare fabric below points X and Y on the pattern, when it’s all sewn together , do you just leave the extra fabric? (I’ve only made it with muslin unlined, so maybe it looks right when done properly).
LikeLike
Alas, I didn’t keep the patterns, so I need more reference for the points x and y. Sorry, but I’m happy to help if you can explain further!
LikeLike
Oops. Thanks for catching that. I’ll try to post that this weekend!
LikeLike
I am thinking about making a similar frock. About how much fabric did you need? Thanks.
LikeLike
Sorry I didn’t see your post. I would say for 45 inch wide, you’ll need close to 10 yds
LikeLike